Monday, May 26, 2014

1977 Go-Tag-Along Revamp

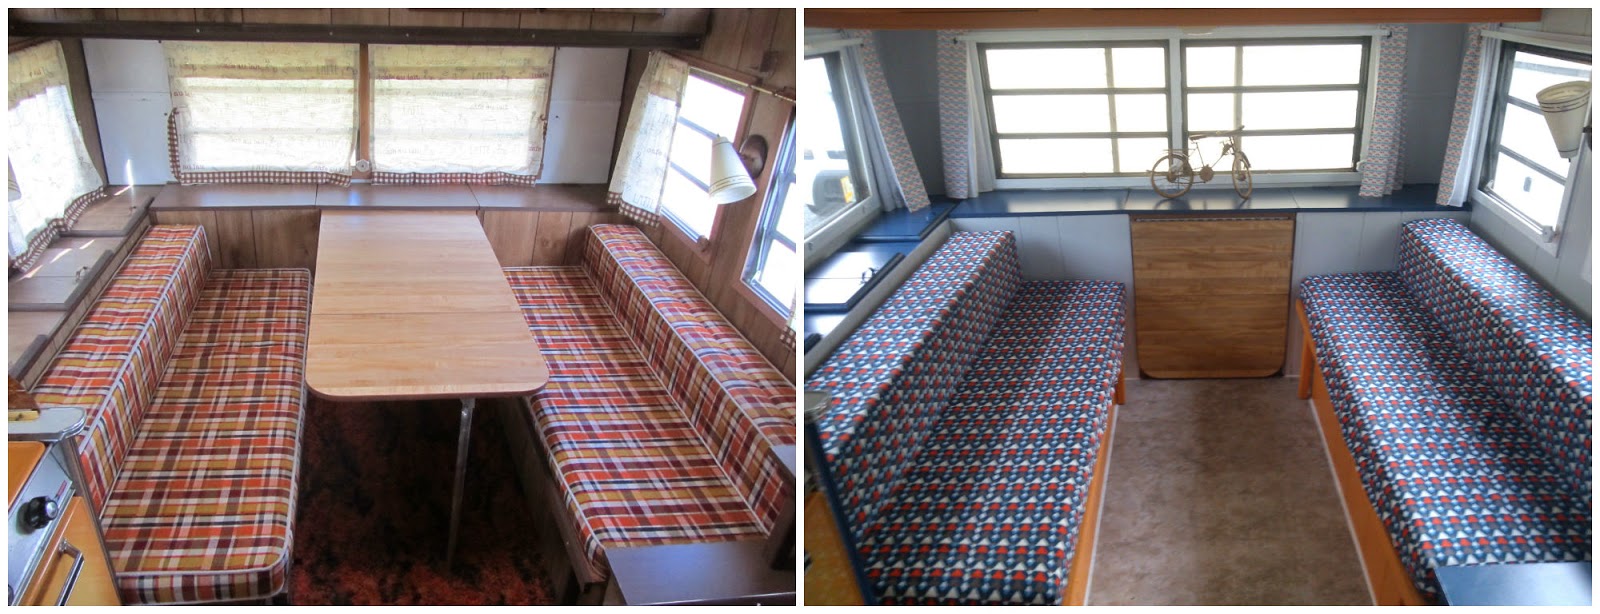
Let me just say, whew! It's done. We bought a vintage camper and made it pretty. At least our version of pretty. We got, Henry, this very loved and well-kept camper in October in 2013. Other than the dated decor of the trailer it was in excellent shape. I toyed with the idea of keeping the cushions as is, because there is something really cool about the plaid but after bringing them inside during the winter to assess the cool factor I decided we had to do it, we had to change it up. Not because the plaid stopped being cool but rather because after a few good jumps from my two year old the cushions just shredded. I mean really who is shocked that 40 year old fabric has it's breaking point. I had decided to paint the walls and cabinets as soon as I saw the pictures when we bought it. I have no love for wood paneling.  All in all, this is what we did:

We reupholstery all of the cushions with grey vinyl and made slip covers (I mean really, who like to sit on vinyl in the heat? They are like fitted sheets) - 2 sets different patterns, incase they get dirty. We ripped out the shag carpet, cleaned the floor and placed vinyl squares, then caulked the edges to seal it. Painted the entire inside - cabinets, ceiling, walls, window seals, and inside some of the cabinets (I was running short on paint). Sewed new curtains and replaced the rusting rods. The cushions were the most difficult part and painting was the most time consuming. I really hate wood paneling... really, REALLY, have I mentioned that? 

I re-did the bathroom too and even though I can see a difference, it still looks like a bathroom that is only slightly larger than a airplane bathroom - so everything is painted white or light blue (cabinet). Not very exciting.

1977 Go-Tag-Along Camper
Outside (Untouched)

Before

After

Dining Area

Dining Area & Back Wall

Kitchen

Long View (Yes, that WAS shag carpet)

Sofa Area & Queen Size Bed

Wednesday, April 16, 2014

Spooning In The Garden

So often I find myself collecting craft supplies and never really using what I already have. Lately I've really tried to only use supplies I have on hand when creating a new project for myself. This project is not one of the projects where I had everything on hand, but you might.  I bought everything new for this project except the Sharpie. 

I tried to use plastic forks first, but then they looked like plastic forks and I worried that they would just look even worse the longer we had them. So I took myself down to the local Family Dollar and bought 32 spoons for $8 and 9 different shades of nail polish for a dollar each. Again, if I had the products at home I would have just used those. The process for making these handy dandy little garden markers has been fairly easy. 


Step #1: Pour Nail polish onto the back of a spoon rather than using the dip and brush method. Then using the brush, coat the back of the spoon in an even layer. Most colors will require at least 3 layers to make it opaque. 


Step #2: Wait patiently for all the spoons to dry.


Step #3: Using a sharpie permanent marker write the names of the plants on the backs of the spoons.


Step #4: Place next to plants (my plants are just starting to break through, I'm sure it will look so much better when they are in the garden) 


Sunday, February 23, 2014

New York Adventures

This post isn't so much about making something new, rather it's a pictorial bucket list to create new memories.

This pretty much only covers upstate New York right now but I hope to have more added for NYC soon.


Wednesday, January 29, 2014

Monster Tails - Results

Ok, so this project isn't my brainchild but I did decide to show my results. I made these for Oliver's birthday party/Dinosaur Train concert.  Rather than redo what the author did so well I'll just post her how to link. Running With Scissors.


Saturday, January 25, 2014

Monster Bean Bag Toss

Gearing up for the big party. I just finished the monster bean bag toss.


Step #1: Supplies - Trifold poster board, exacto knife, black marker (fat tip is preferred), pencil and paint.

Step #2: Draw out your design in pencil then outline it in marker. Make sure whatever holes you use are large enough for a bean bag to fit through with a little room.


Step #3: Paint your monsters. I used acrylic paint but tempera would work as well. You can do a flat paint job or add accent shading - either way will look nice, I went with shading because I am comfortable with it.


Step #4: When the paint is dry outline the monster in black marker to make it pop.


Step #5: Carefully cut out mouth holes with an exacto knife.


Step #6: Add triangle support to the back of the board so it doesn't fall over when hit with a bean bag.

Step #7: Enjoy!


Sunday, January 19, 2014

No home is complete without a kiddy table...


Over the past few weeks we have noticed the lack of an important piece of furniture in our home, the all important kiddy table.  Having served an 18 month mission for our church in Korea I fell in love with their mini fold up tables that somehow allowed everyone to gather around. They folded up very neatly and stored really well and allowed for additions. Upon discussing the options for a kids table in our home I told Brian I didn't want to have to worry about chairs, because let's be honest, they are extra pieces of furniture that you constantly have to teach your kids to sit in. So we decided to go with the Korean version of a table. I'll be making floor pads for them to sit on as well. We discussed just picking one up at Lotte Mart the next time we were in Baltimore but why not take this opportunity to learn a new skill. I will say that based on my abilities I opted for non-folding short legs.

Here goes...

Supplies -
-Wood board - for table top
-4 Wood legs with screw already in place
-4 Straight Top Plates (see picture below)
-Stain color of your choosing - You could probably use an acrylic wash if you want to add color but I used an actual wood stain
-Polyurethane
-Rags
-Brushes
-Drop cloth

Step #1: Purchase your choice of table top. Either Lowes or Home Depot have prefabricated boards that have been sanded and cut to size. You will have several options but we went with 3/4"x 24"x 48".  This is bigger than the standard kid dinner table but I wanted them to have extra room for art projects. Or if they were having friends over they could all huddle up. Purchase additional supplies if needed. Note: the wooden legs are typically in the same section at the wood trim and you will usually have half a dozen options for style.


Step #2: Using a rag, I made some out of towels we never use, apply the stain to the wood surfaces (table top and legs). If you want more of a wash look where you see the wood grain don't use very much stain. If you want an more opaque look you may have to do several coats. The key to doing anything with wood and having it look nice, ALWAYS GO WITH THE GRAIN! Always.


Step #3: For ours I chose to add a pattern cut out from my silhouette machine and an extra layer of stain. Not really because I wanted to but rather because my dear sweet husband trying to help, screwed the straight top plates on the wrong side. Unfortunately the underside was a little sloppy on the edges and this was my fix. Lemonade anyone?


Step #4: Allow for the stain to dry, then apply polyurethane to the surface of the wood with a paint brush. Make sure you don't over brush or apply too heavily. Allow to dry and repeat 2 more times. I went with a semi-gloss for our surface finish because it will be used for food but I don't love the super shiny look.


Step #5: When all coats of polyurethane have set apply straight top plates to the under surface of the table top. Decide how far in you want the legs to be. For us we opted for 2 inches on both sides of the corner.


Step #6: Mark the screw holes with a marker or screw.


Step #7: Drill holes prior to screwing in the straight top plates. Brian cut pieces of card board and put them on the drill bit to keep him from screwing to far and going through the other side.


Step #8: Screw in plates.


Step #9: Attach legs by screwing them into the center hole in the plate.


Step #10: Set upright and enjoy.


Step #11: Place flat cushions.


Sunday, January 12, 2014

Flag Streamers For a Poster Board

Lucky me, I got as close to my dream calling as possible. I was recently called to be the Relief Society Secretary in my new ward. Apparently I have either completely failed at being a secretary for the last 10 years or I'm just so stellar at it they keep calling me back for more. Anyway back to my dream calling, ward bulletin board specialist. Guess what the secretary does? If you guessed a bunch of other things and the opportunity to do the bulletin boards you would be right! So here it is, some of the steps in the process. I will warn that all letters cut out were done with my silhouette machine (like a cricket but much cooler because it gives you a lot more creative uses). So if you start to think I am more amazing than I really am, rest assured I have mechanical assistance.

This method is specifically for bulletin boards or locations where you want the streamer to be consistently secure without the having a million tacks or staples showing. We used this same method when we made banners for Oliver's circus room. Those banners I made from felt and ribbon but the same principles apply.

Step #1: After deciding what you want your flag streamer to say and how big you want it to be, cut out the letters and stick them on a rectangle piece of card stock. I will warn that the better quality paper the longer the banner will hold up. Also anything with a pattern or texture does not allow vinyl to adhere as well.


Step #2: Cut the bottom of the flag in an upside down "V" shape. Because of the letters and over all feel I am going for the "V" shape did not have to be precise. In fact I tried to make it noticeably wonky.


Step #3: Push push-pins into the top corners of the flags.


Step #4: Using a hot glue gun run a thin line of glue across the top of the flag. Be sure to cover the push-pins.


Step #5: Place ribbon over the glue line but don't allow the top of the flags to stick out above the ribbon. With each letter you attach use the same distance for spacing the flags. *** Make sure to leave a tail on the front and back of the string of streamers.


Step #6: Make sure all push-pins are straight and that no paper is showing above the string of ribbon.


Step #7: Lay out streamer to ensure it has the desired look. If it doesn't, well unfortunately you pretty much have to scrap it and start over.


I'll post the final pictures of the bulletin board when I complete the remaining parts.

Update: I'm not sure it's finished but here is at least a progress shot.